Using workflows in Dynamics
Workflows are currently available for Case Management and Childcare applications only.
Dynamics Workflows are a powerful tool that allow for simple or complex automation of a series of steps and rules that serve to enhance the business processes. They run on a selected entity, and can be initiated manually or automatically in a number of different ways.
New email Workflows can be created from scratch, or based on an existing template.
The links below take you to the information you need to use Workflows:
> Accessing Workflows and Templates
> Creating a new Workflow Process
Accessing Workflows and Templates
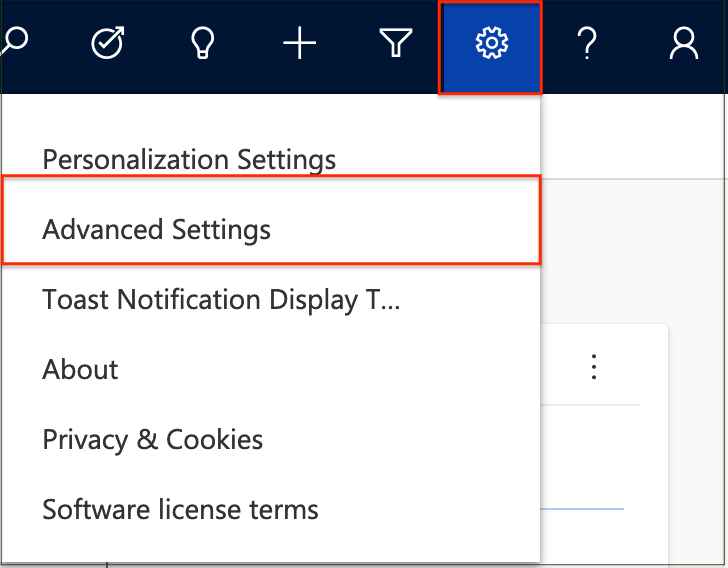
Click on the 'Settings' icon near the top-right corner of the page and select 'Advanced Settings' from the dropdown list to open a new window for Settings.
Click on the down arrow to the right of 'Settings' on the top navigation bar to display the Settings area of the site map.
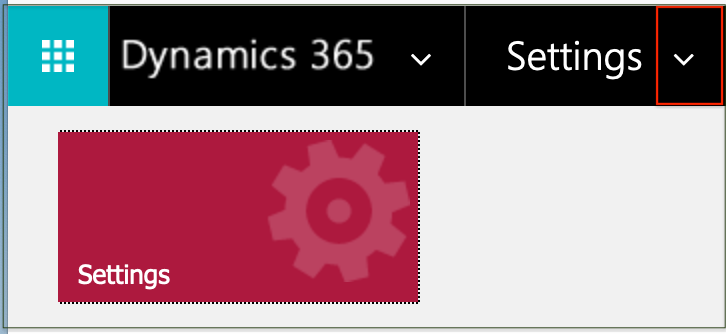
Clicking on 'Settings' will display the Process Center option for the application.
The tile is labeled 'Workflows' for Case Management.
The tile is labeled 'Processes' for Childcare.
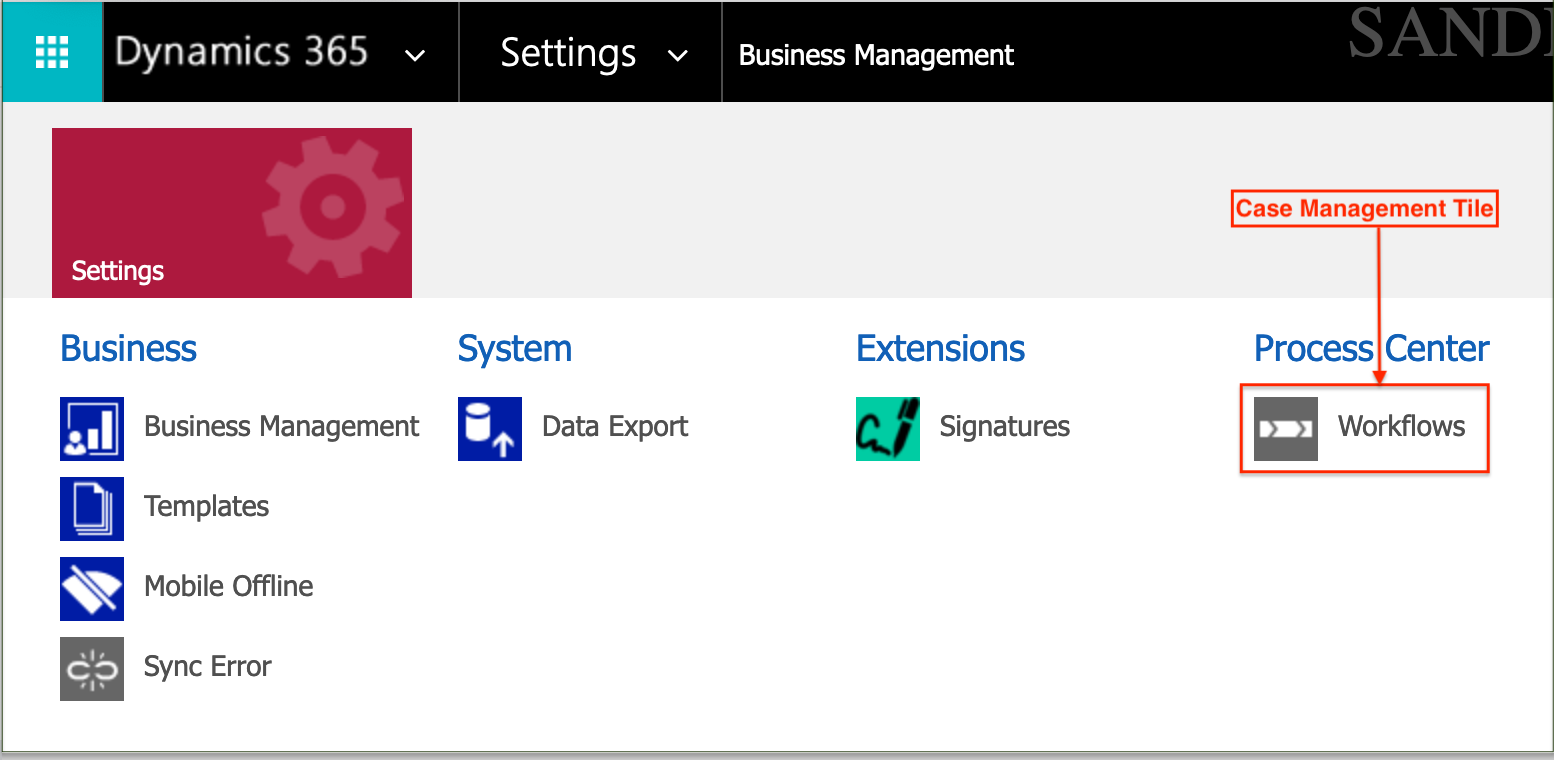
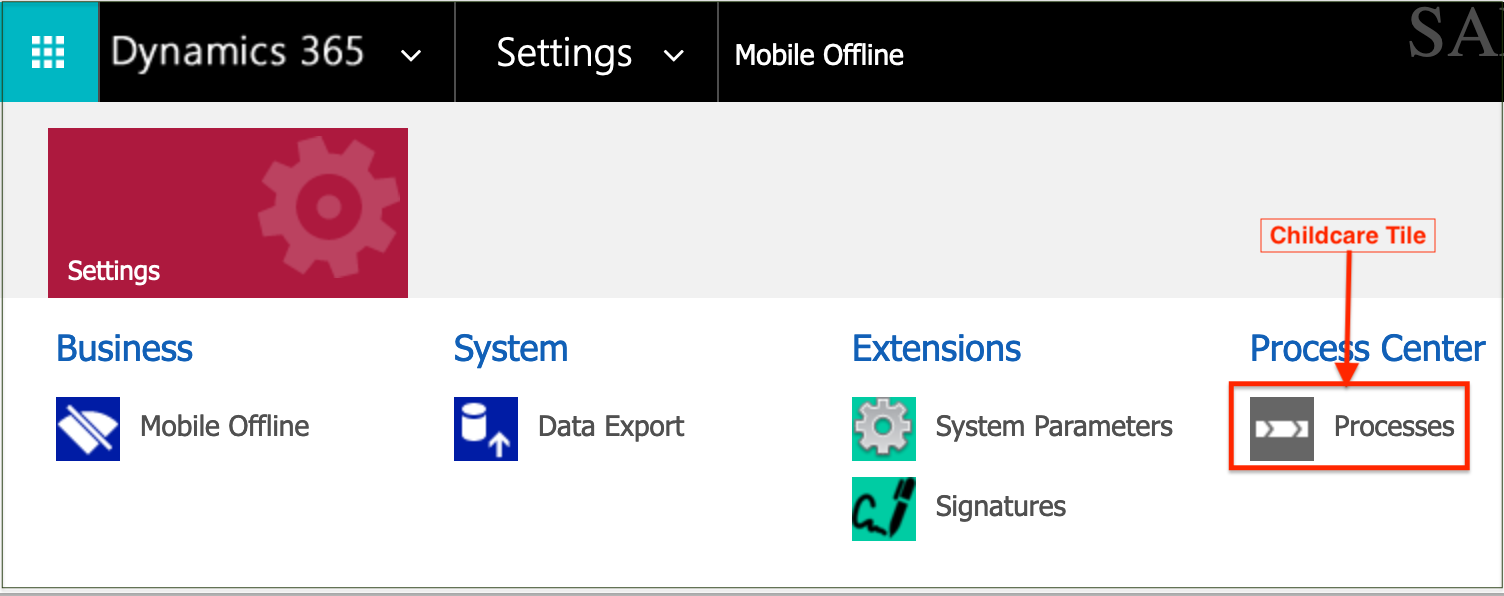
Clicking on the Process Centre option will display a Processes list with a drop down list of system views for selection.
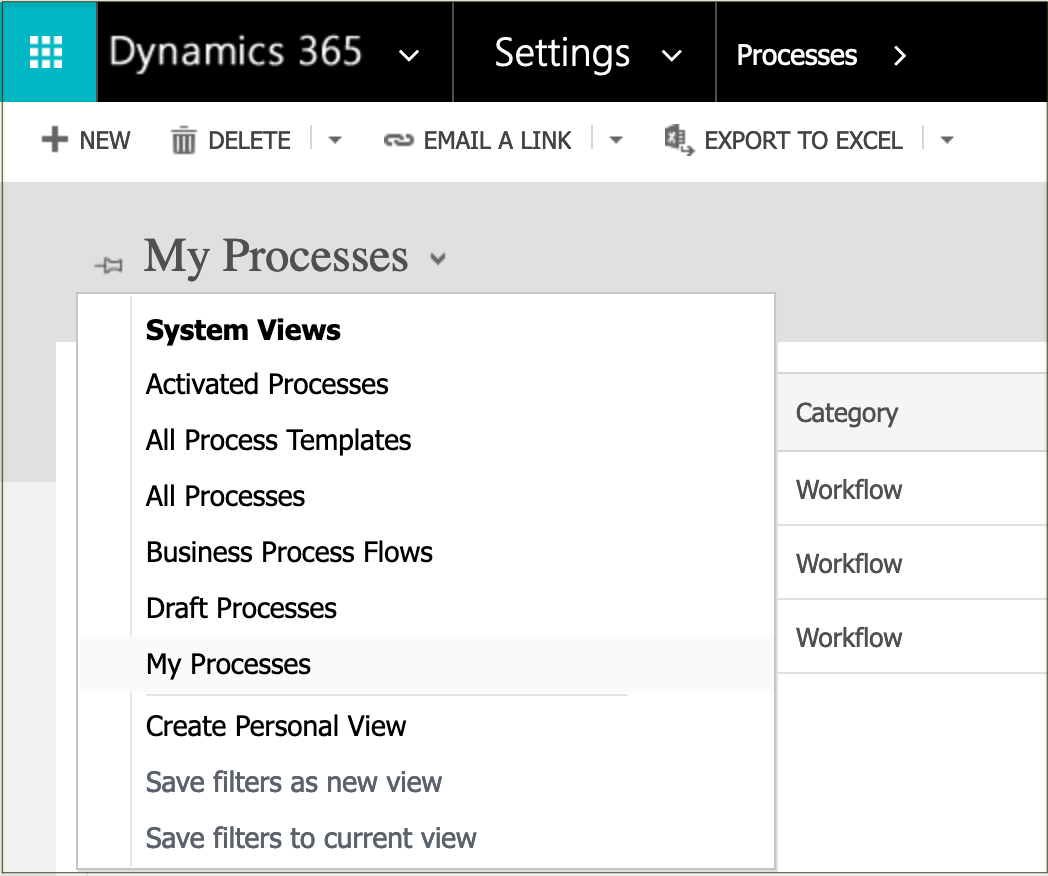
Selecting 'All Processes' will display a list of all the Dynamics processes which can then be filtered by Category, Owning Business Unit, Status and Primary Entity as required.

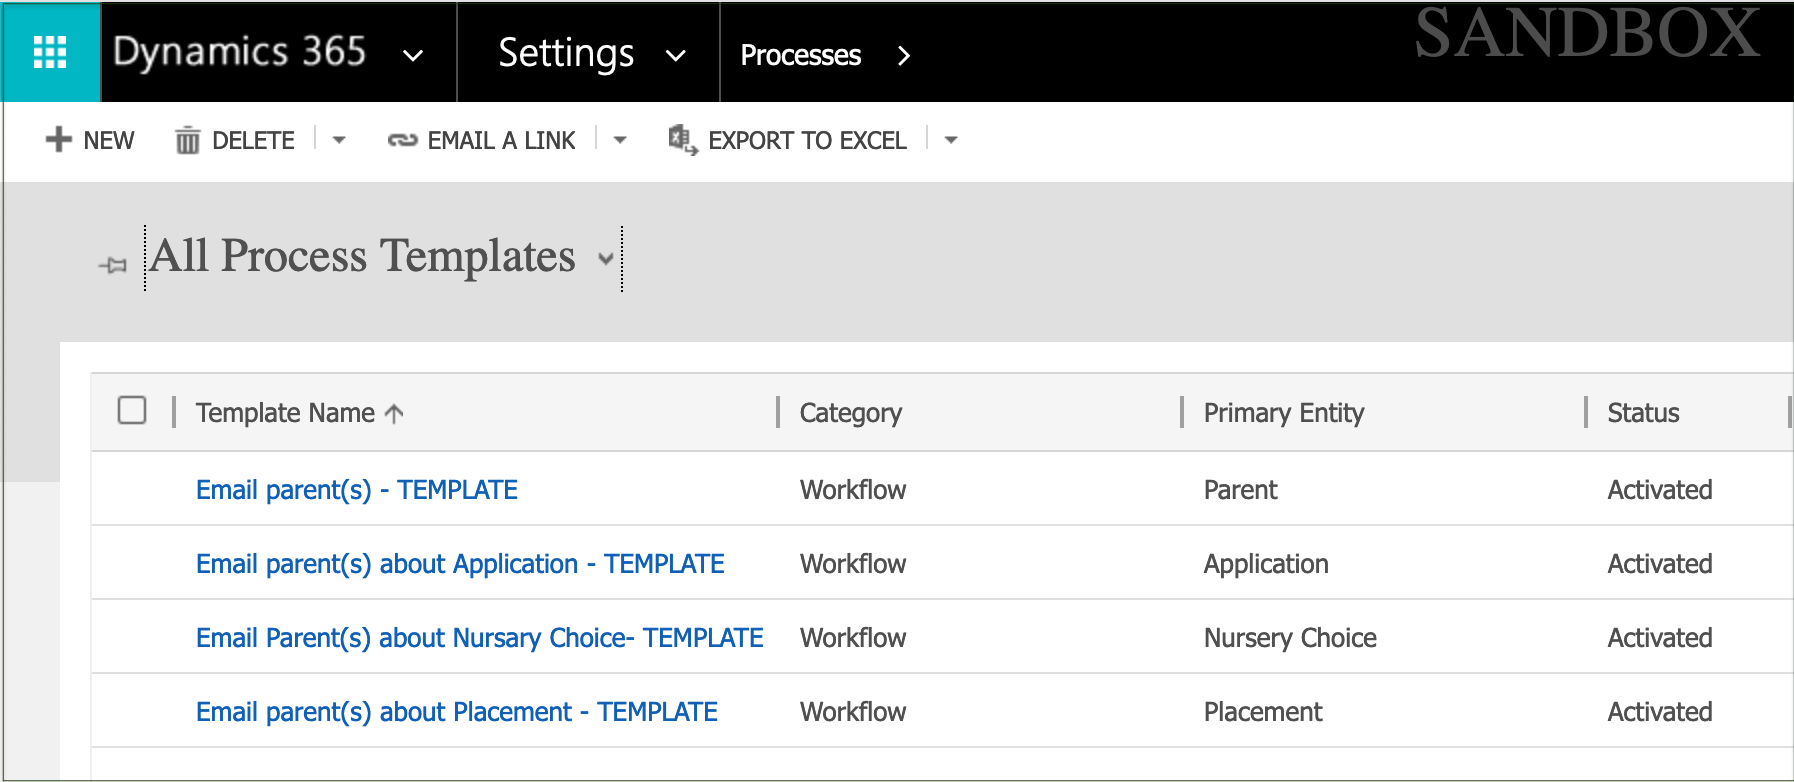
Selecting 'All Process Templates' will display a list of existing workflow templates.
Creating a new Workflow Process
A new Workflow can be created by users with the relevant permission.
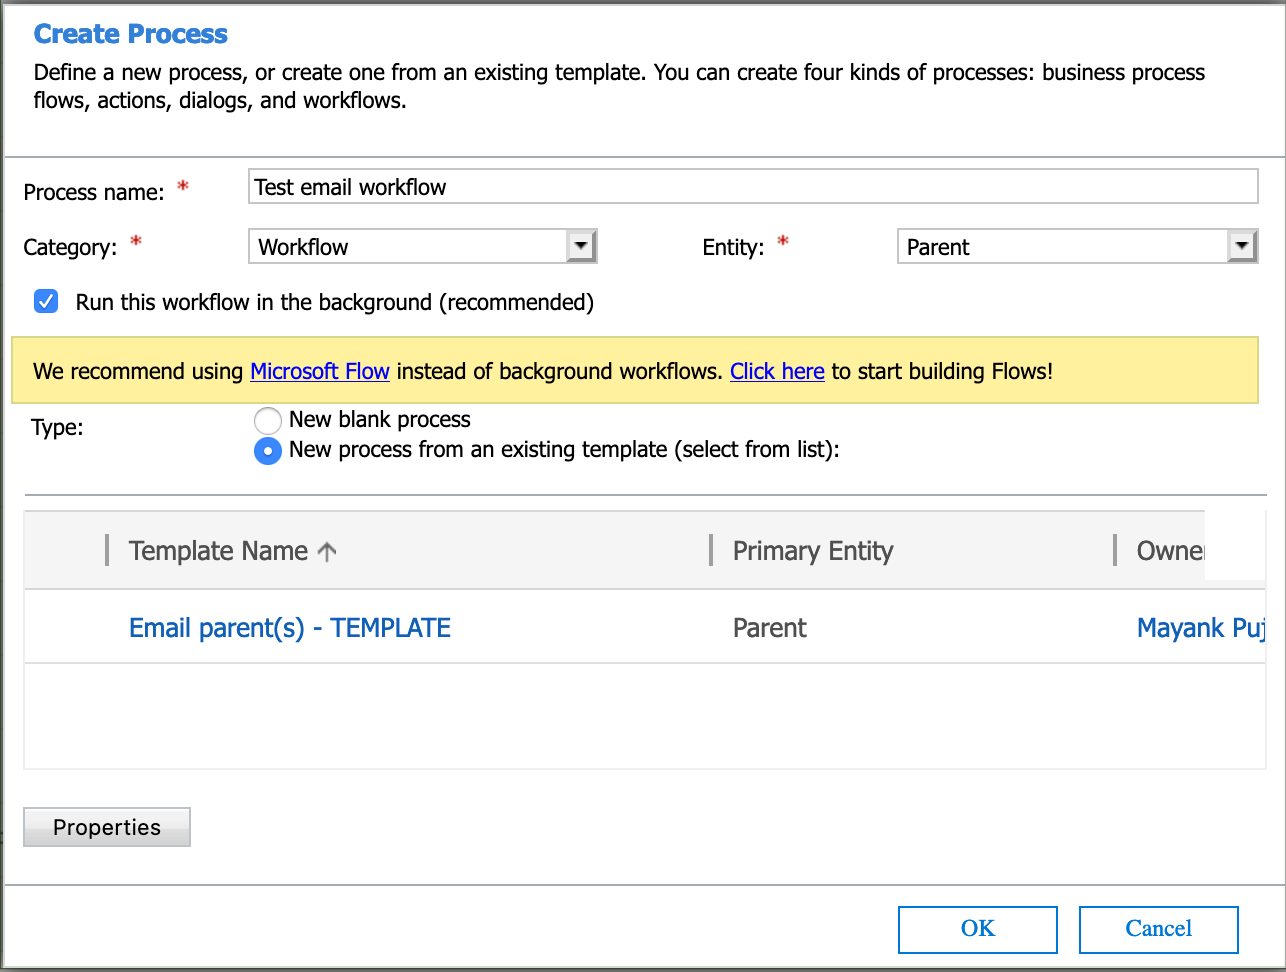
Click on the 'New' icon on the top navigation bar to open a form and enter the basic details of the workflow.
Enter a Process name.
Select Category = 'Workflow'.
Select the Entity for the type of record it will be related to.
Select Type and Template to be used, if one exists for the entity.
Click 'OK' to create the new process.
If the workflow is to run on demand, tick 'As an on-demand process'.
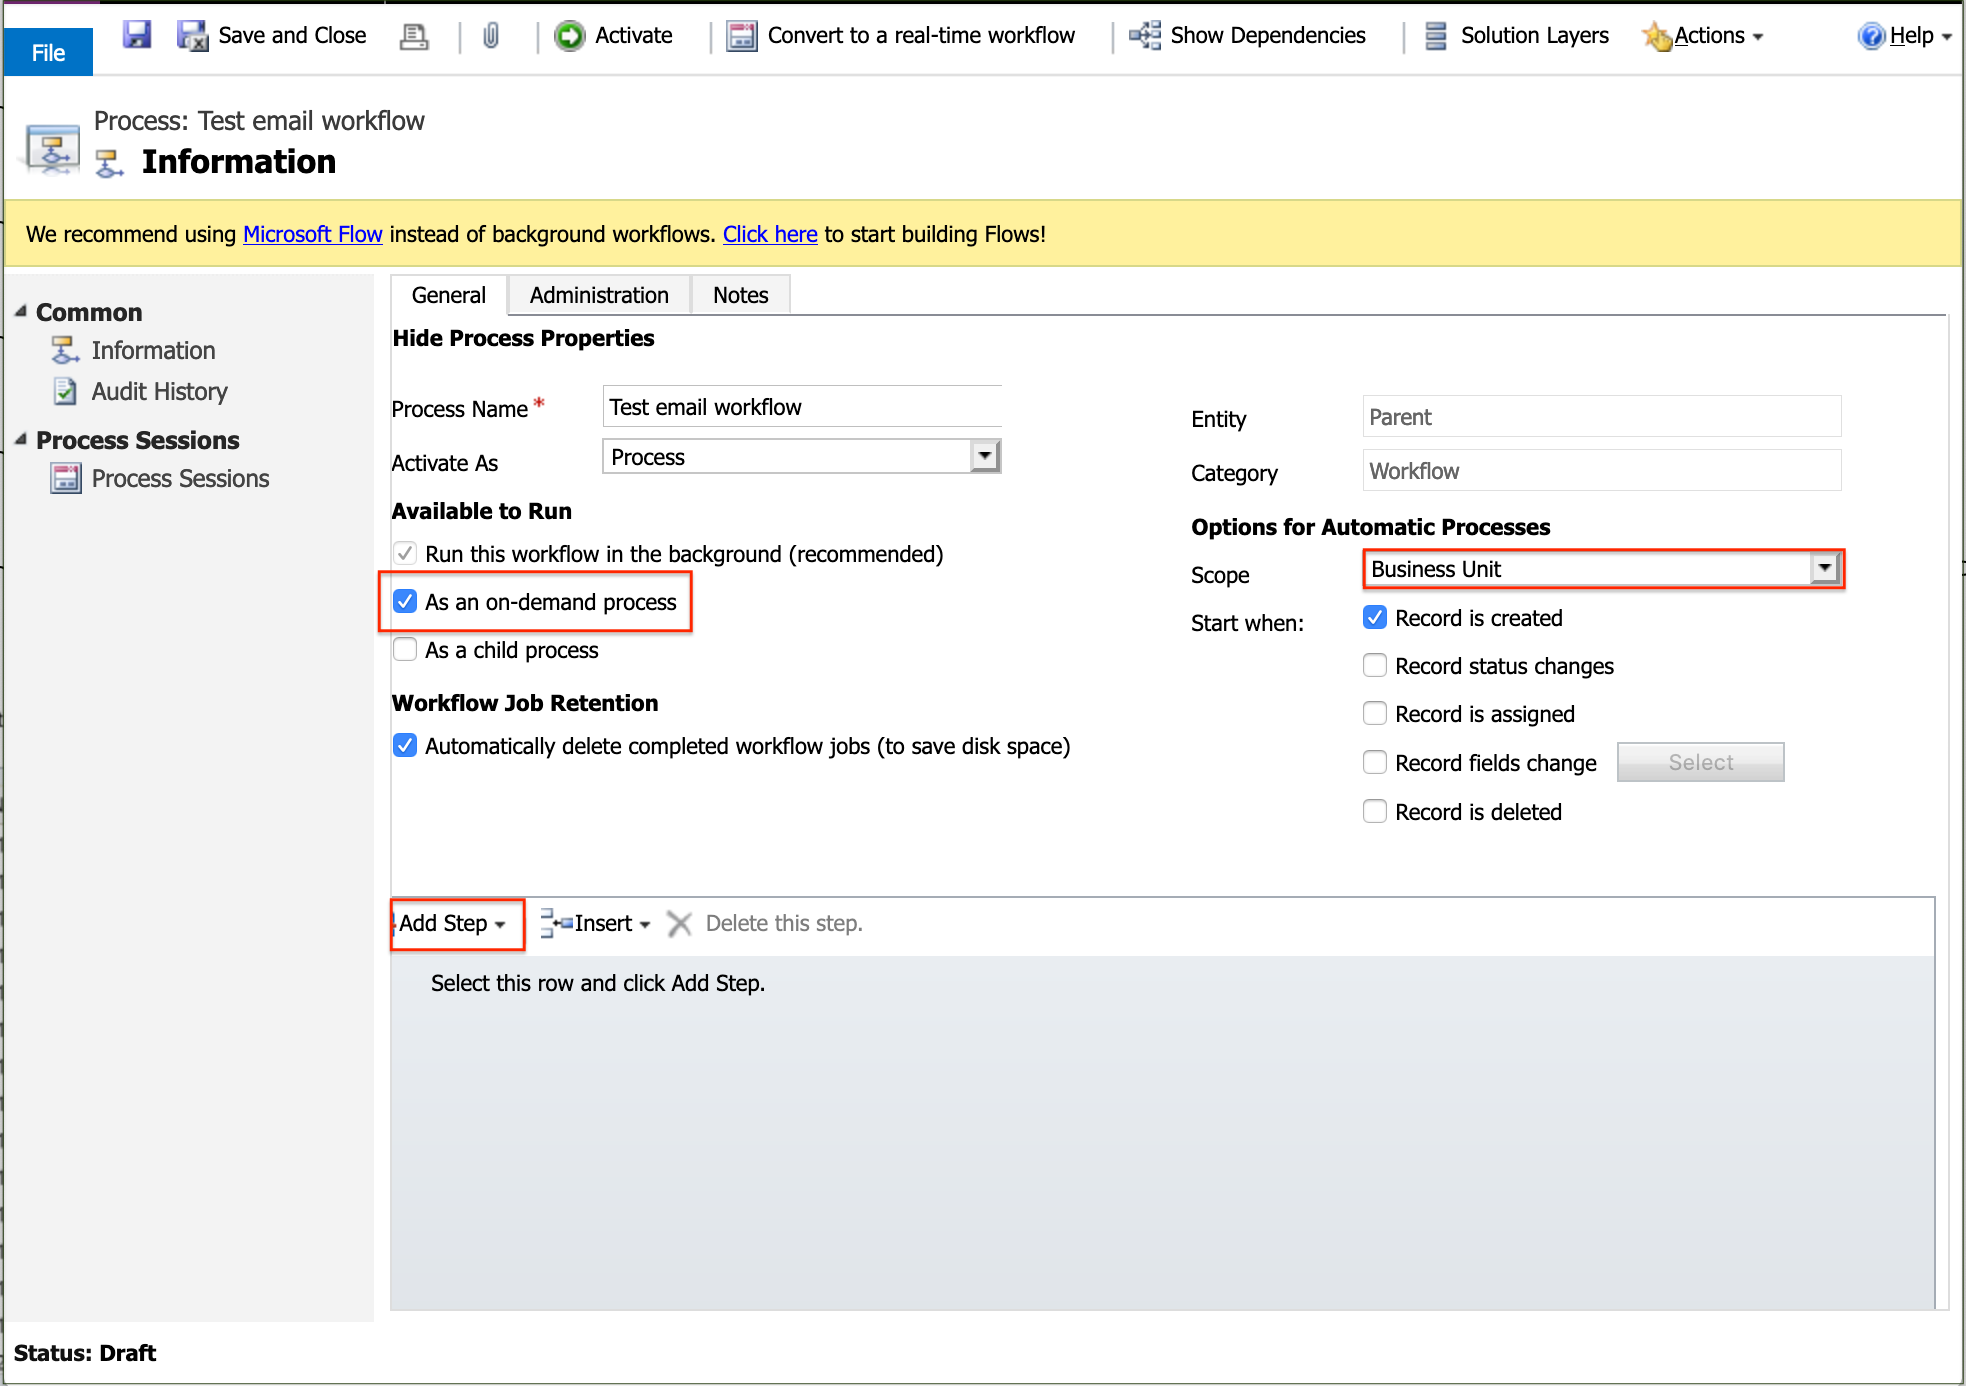
If the workflow is to run automatically, select a ''Start when:' trigger and the 'Scope' for the Workflow to run on:
- 'User' - runs on records with the same owner as the Workflow
- 'Business Unit' - runs on records owned by any user in the same Business Unit as the owner of the Workflow
- 'Parent: Child Business Units' - runs on records owned by any user in the same Business Unit
- 'Organization' - runs records owned by any user
The following sections describe how to add steps for creating different workflow components.
Creating an email Workflow
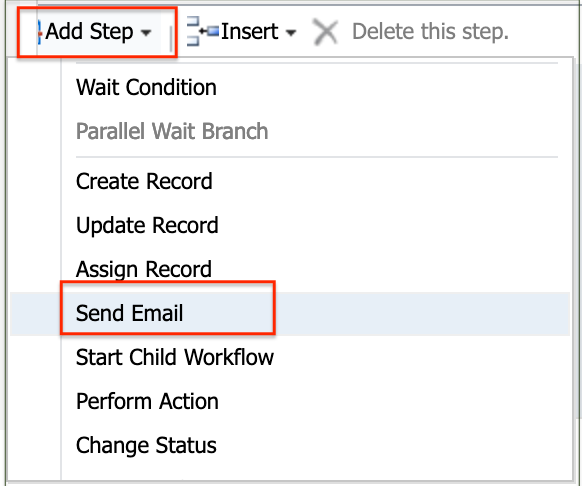
Click on 'Add Step'
Scroll down the drop down list and select 'Send email' to add the step.
Type in a description for the step.
Click on 'Set Properties' to write the content of the email.

To create an email from an existing template
If a template has been selected for use, it will be displayed for the user to customise the text and fields on the email being created.
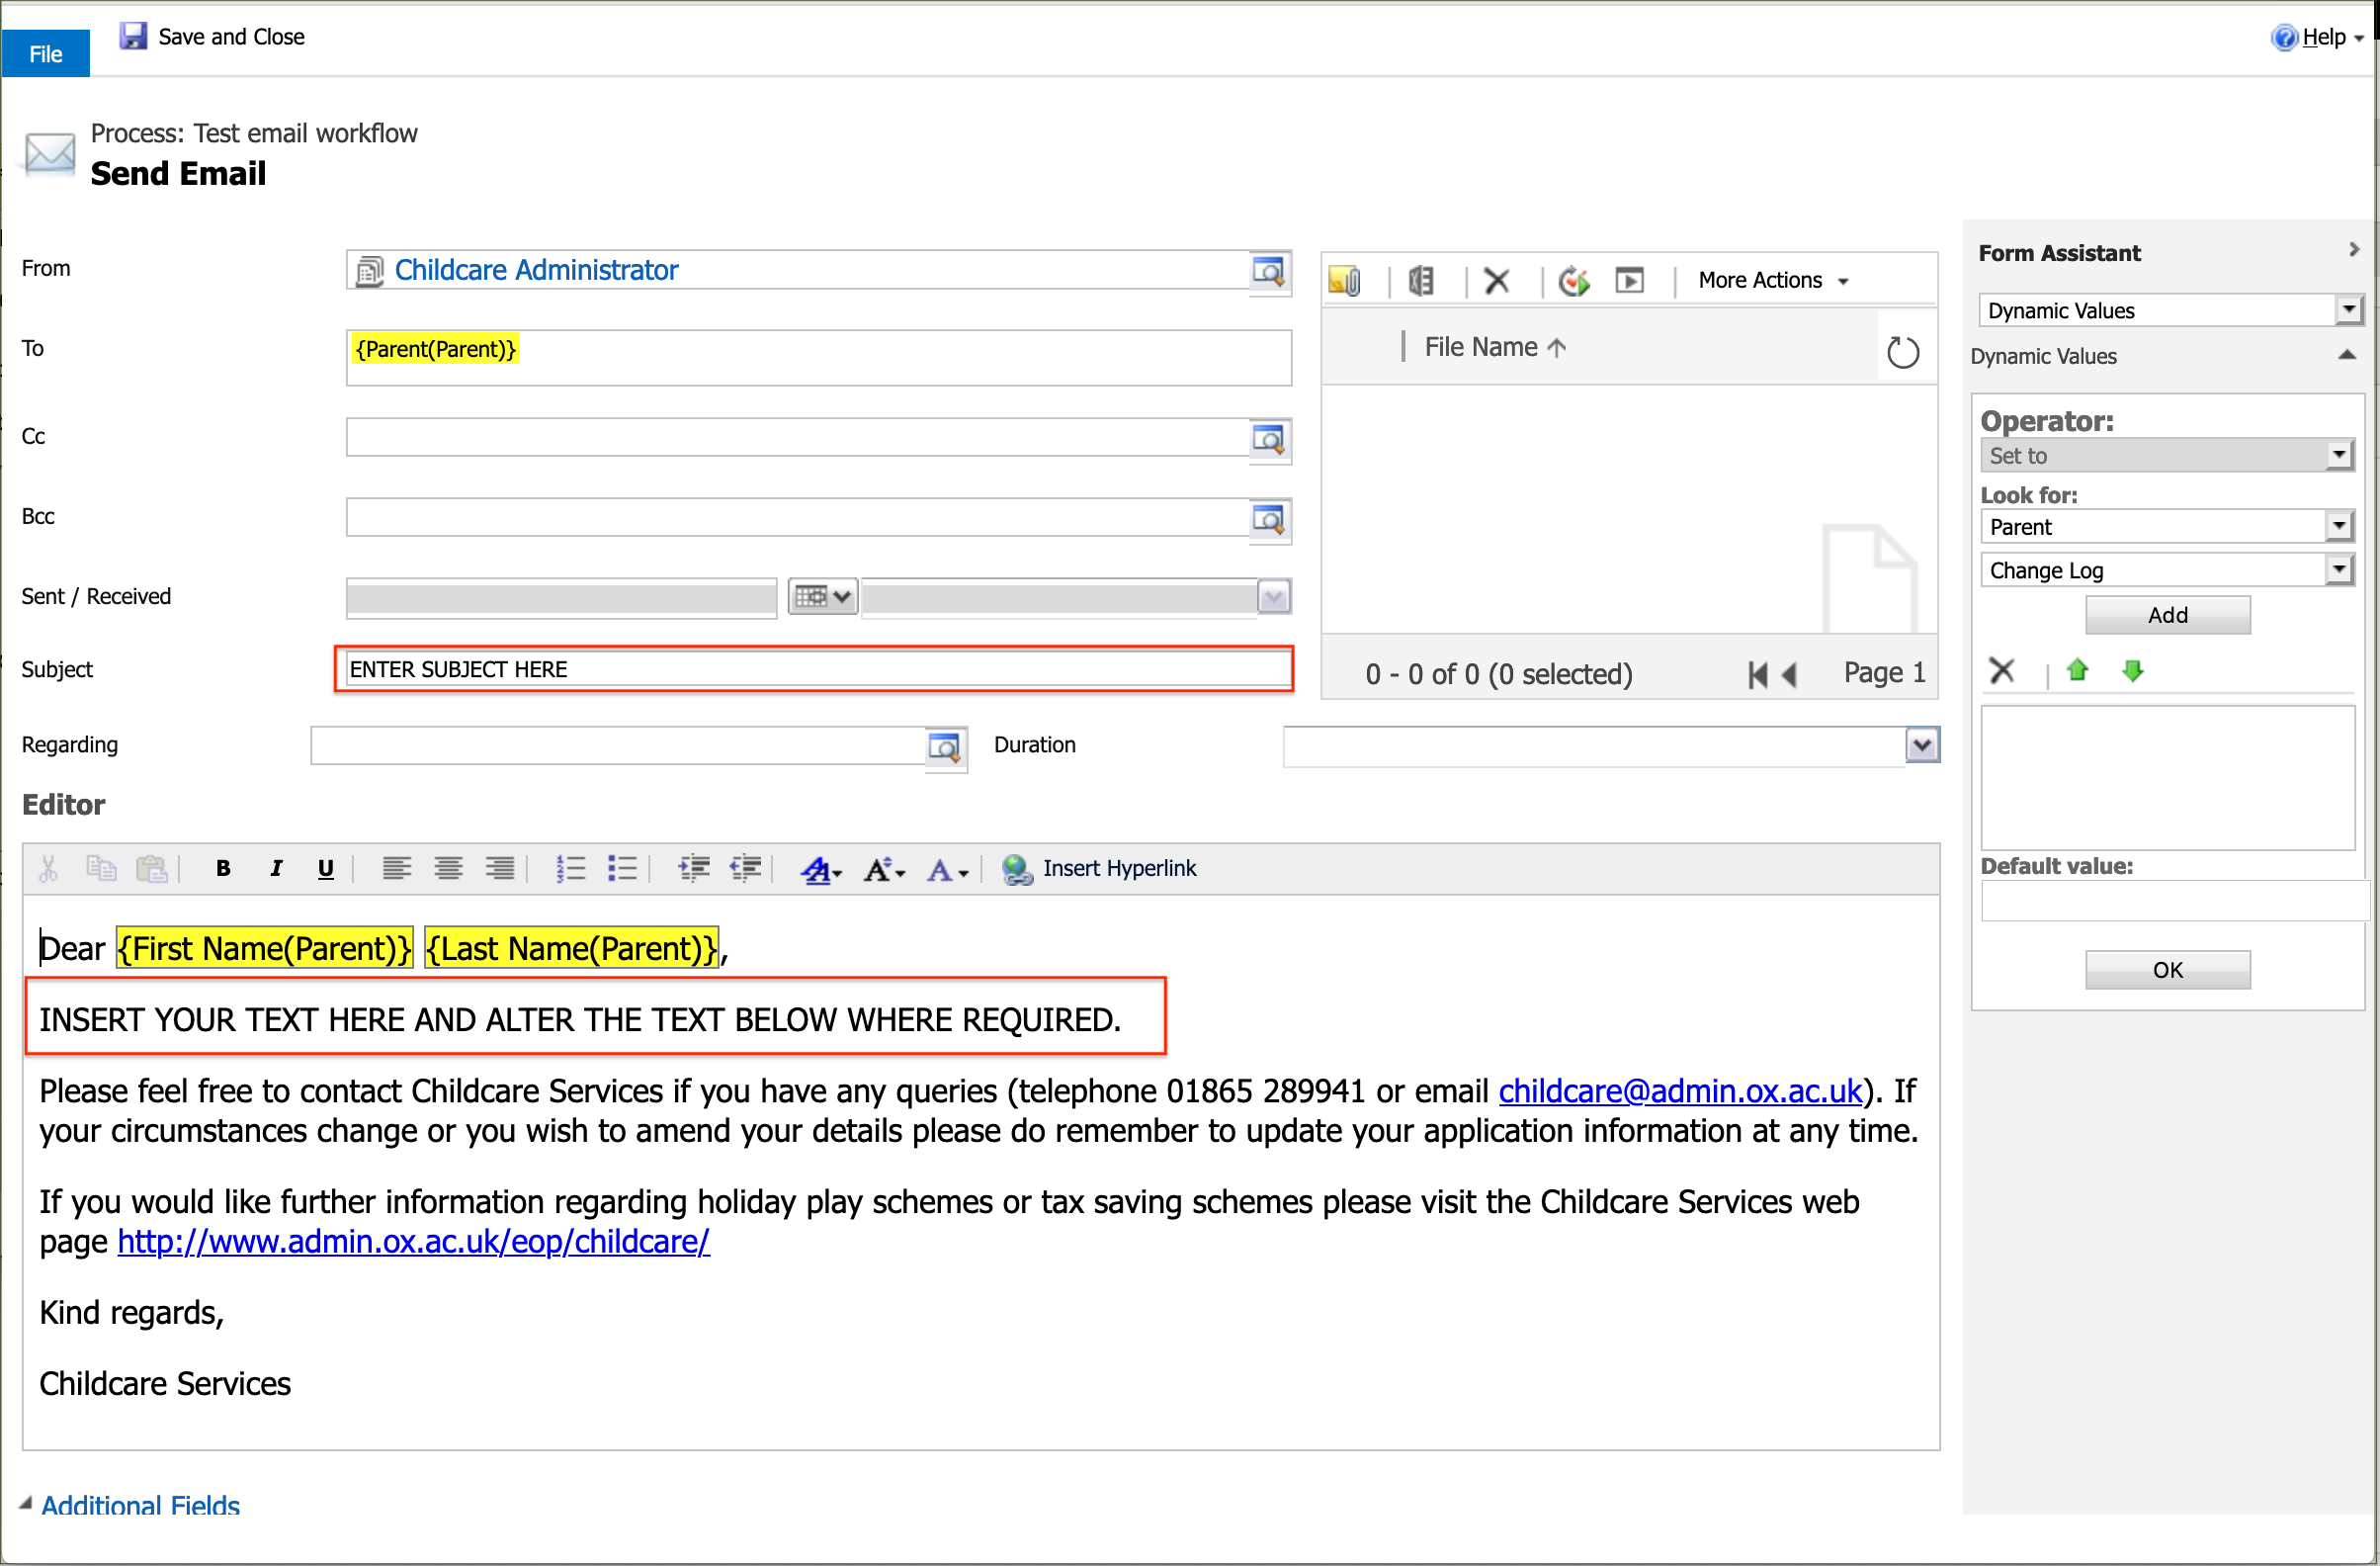
Enter a Subject and insert and/or amend the default email text as required.
Additional dynamically populated fields can be added in the same way as when creating an email from a blank form below.
Click 'Save and Close' when the email is completed.
To create an email from a blank form
If a template has not been selected, the email must be created from a blank email form.
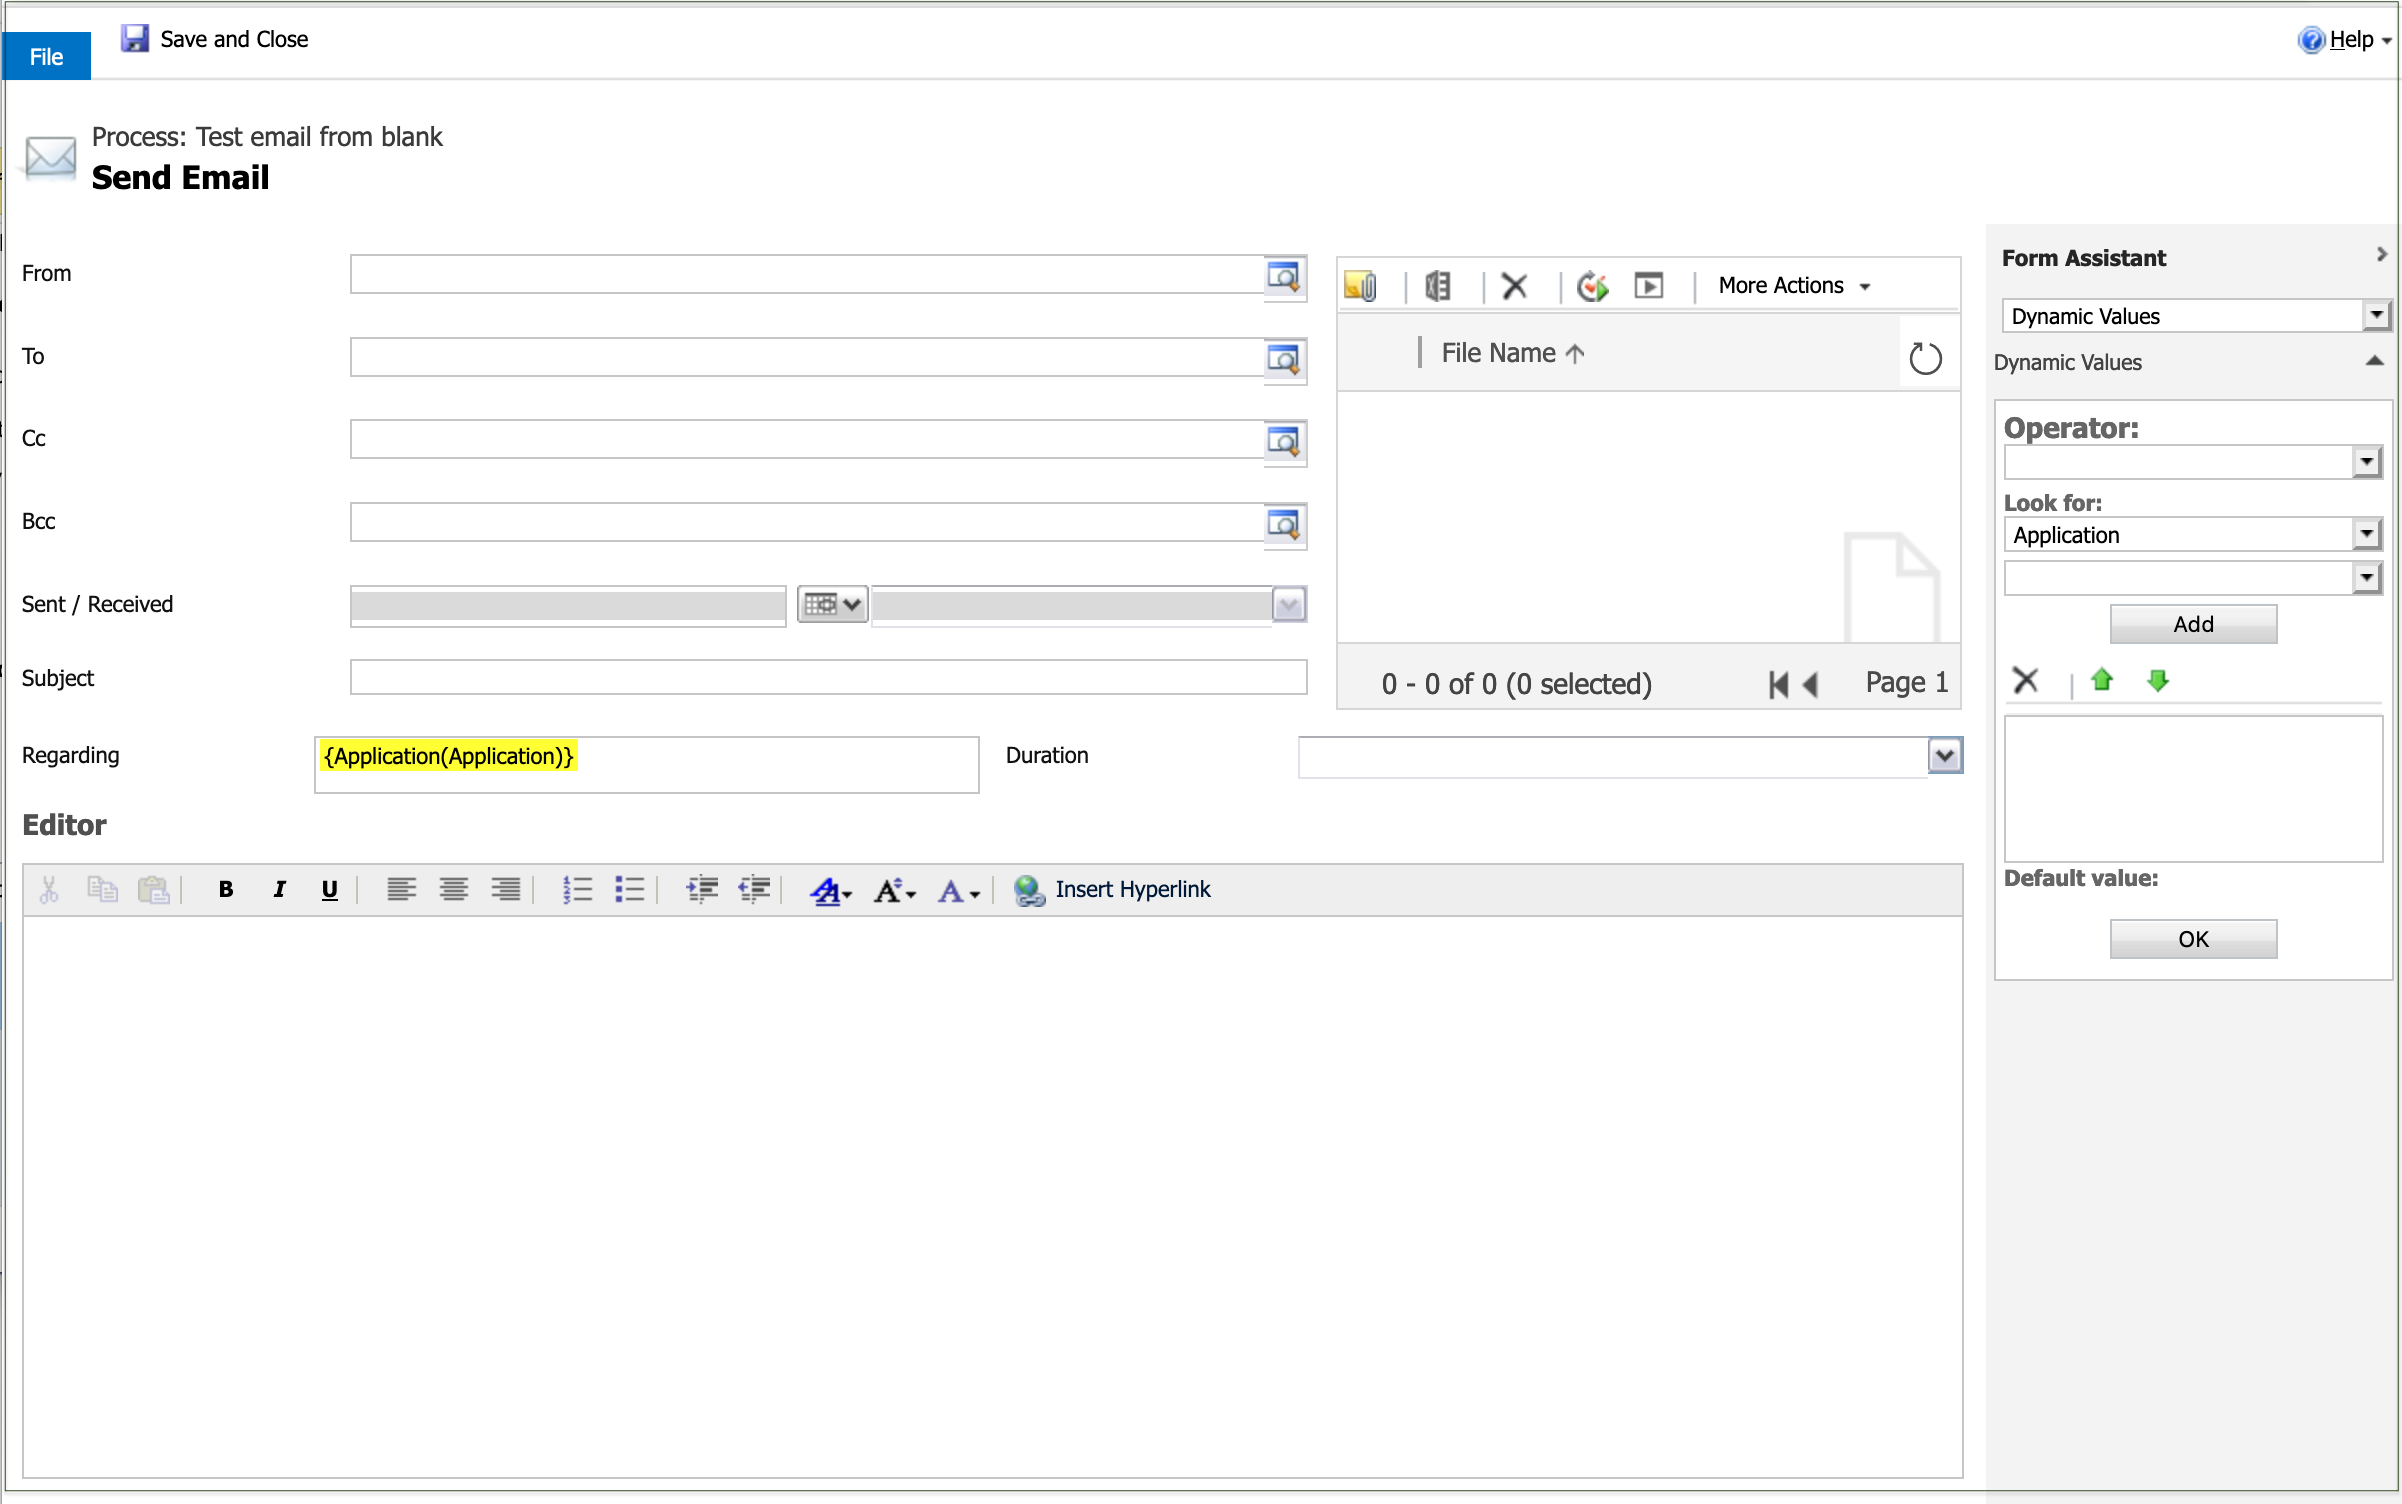
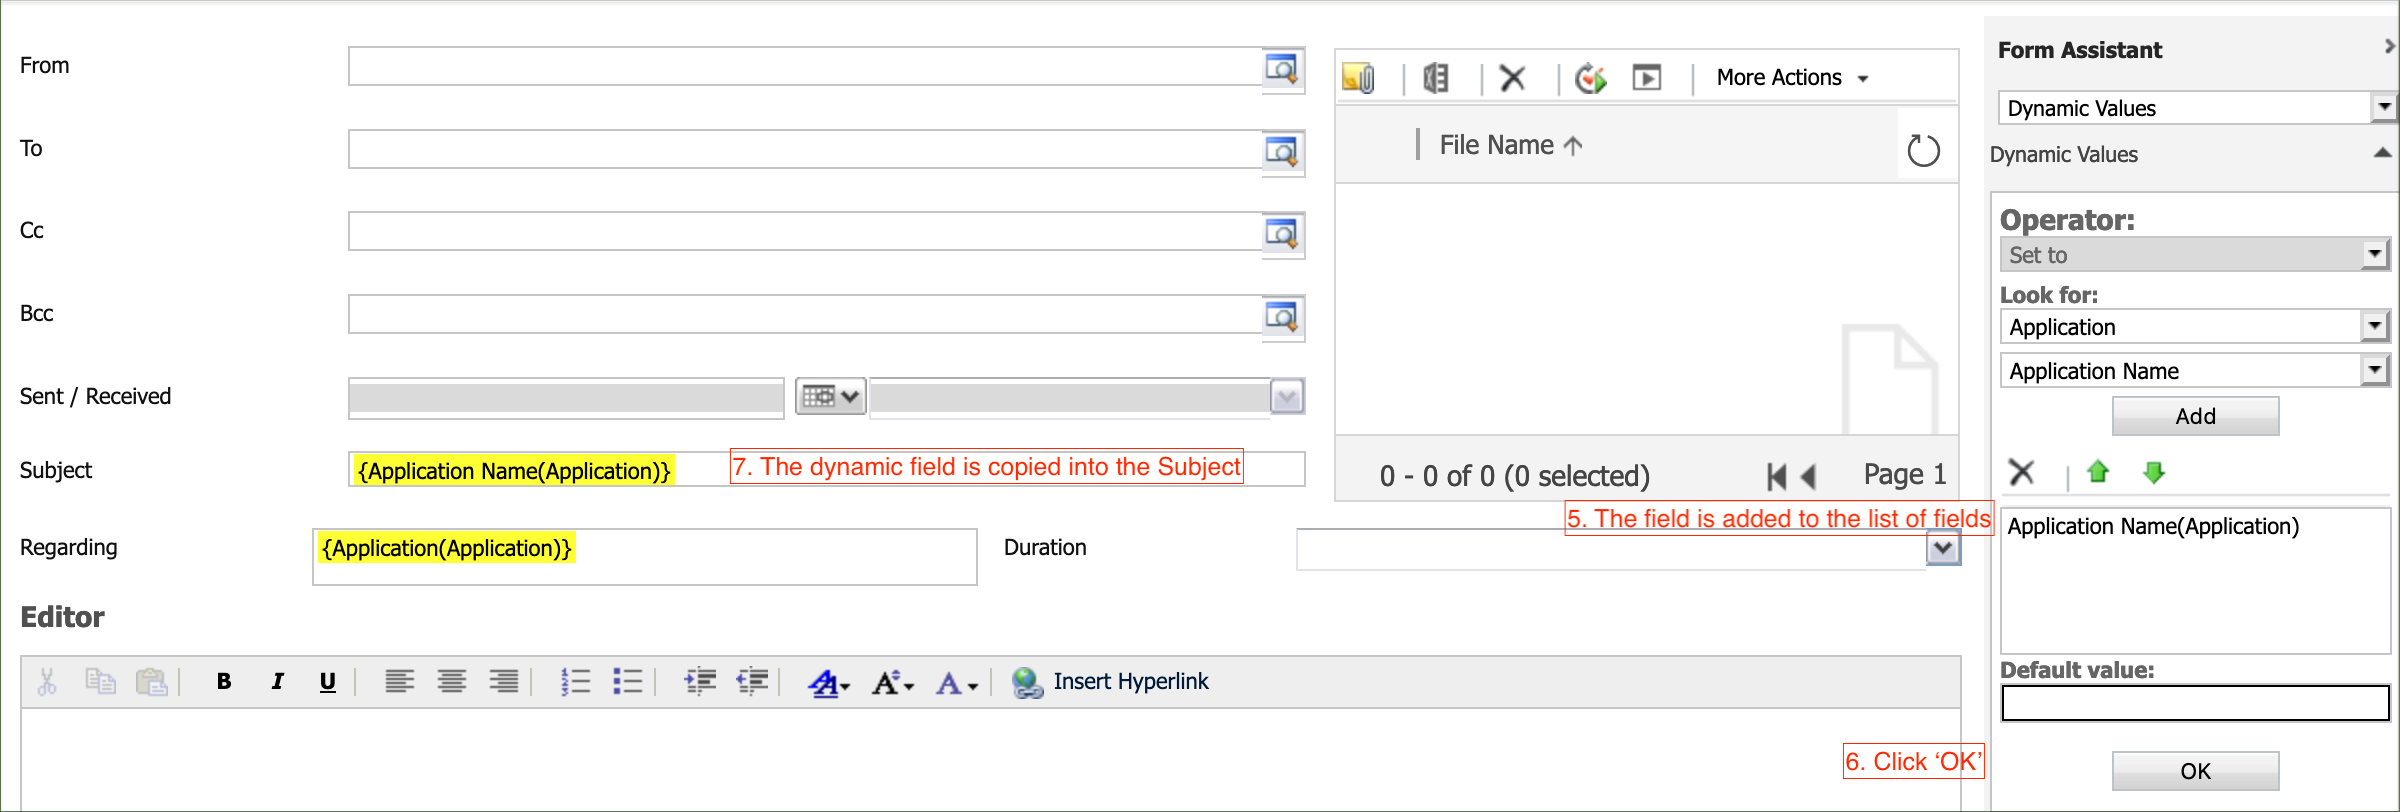
To create dynamically populated values from the database, use the Form Assistant on the right.
For example, to populate the 'Subject' field with the Application Name on an Application email follow the steps below:
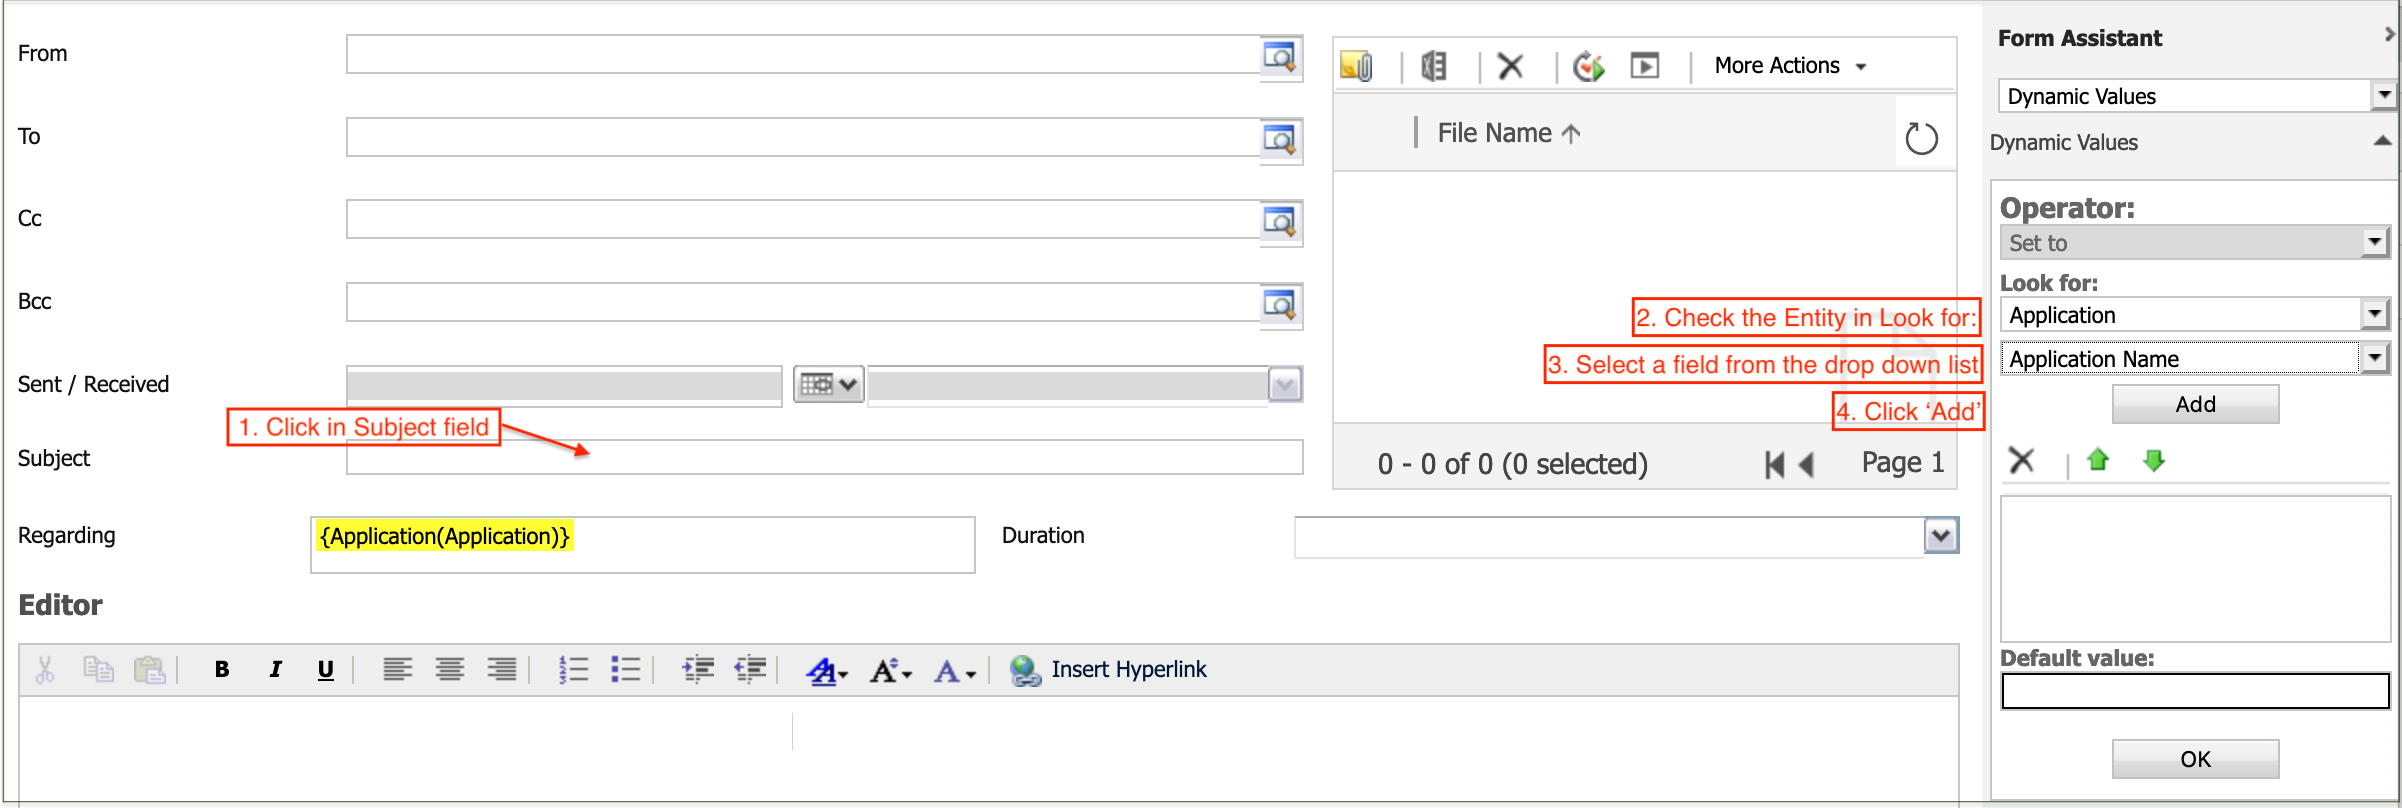
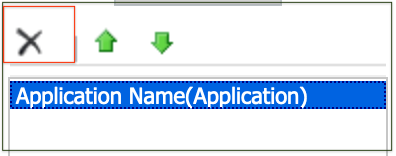
Before adding another field to another area, the previous one must be removed by highlighting the fields and clicking the 'Remove' icon.
Text and dynamic fields can be added to the other areas of the email in the same way.
Fields can be added from a record which is related to the main record type by selecting a related entity.
For example, select 'Parent' entity and follow the steps below to populate the Title and Last Name of the Parent:
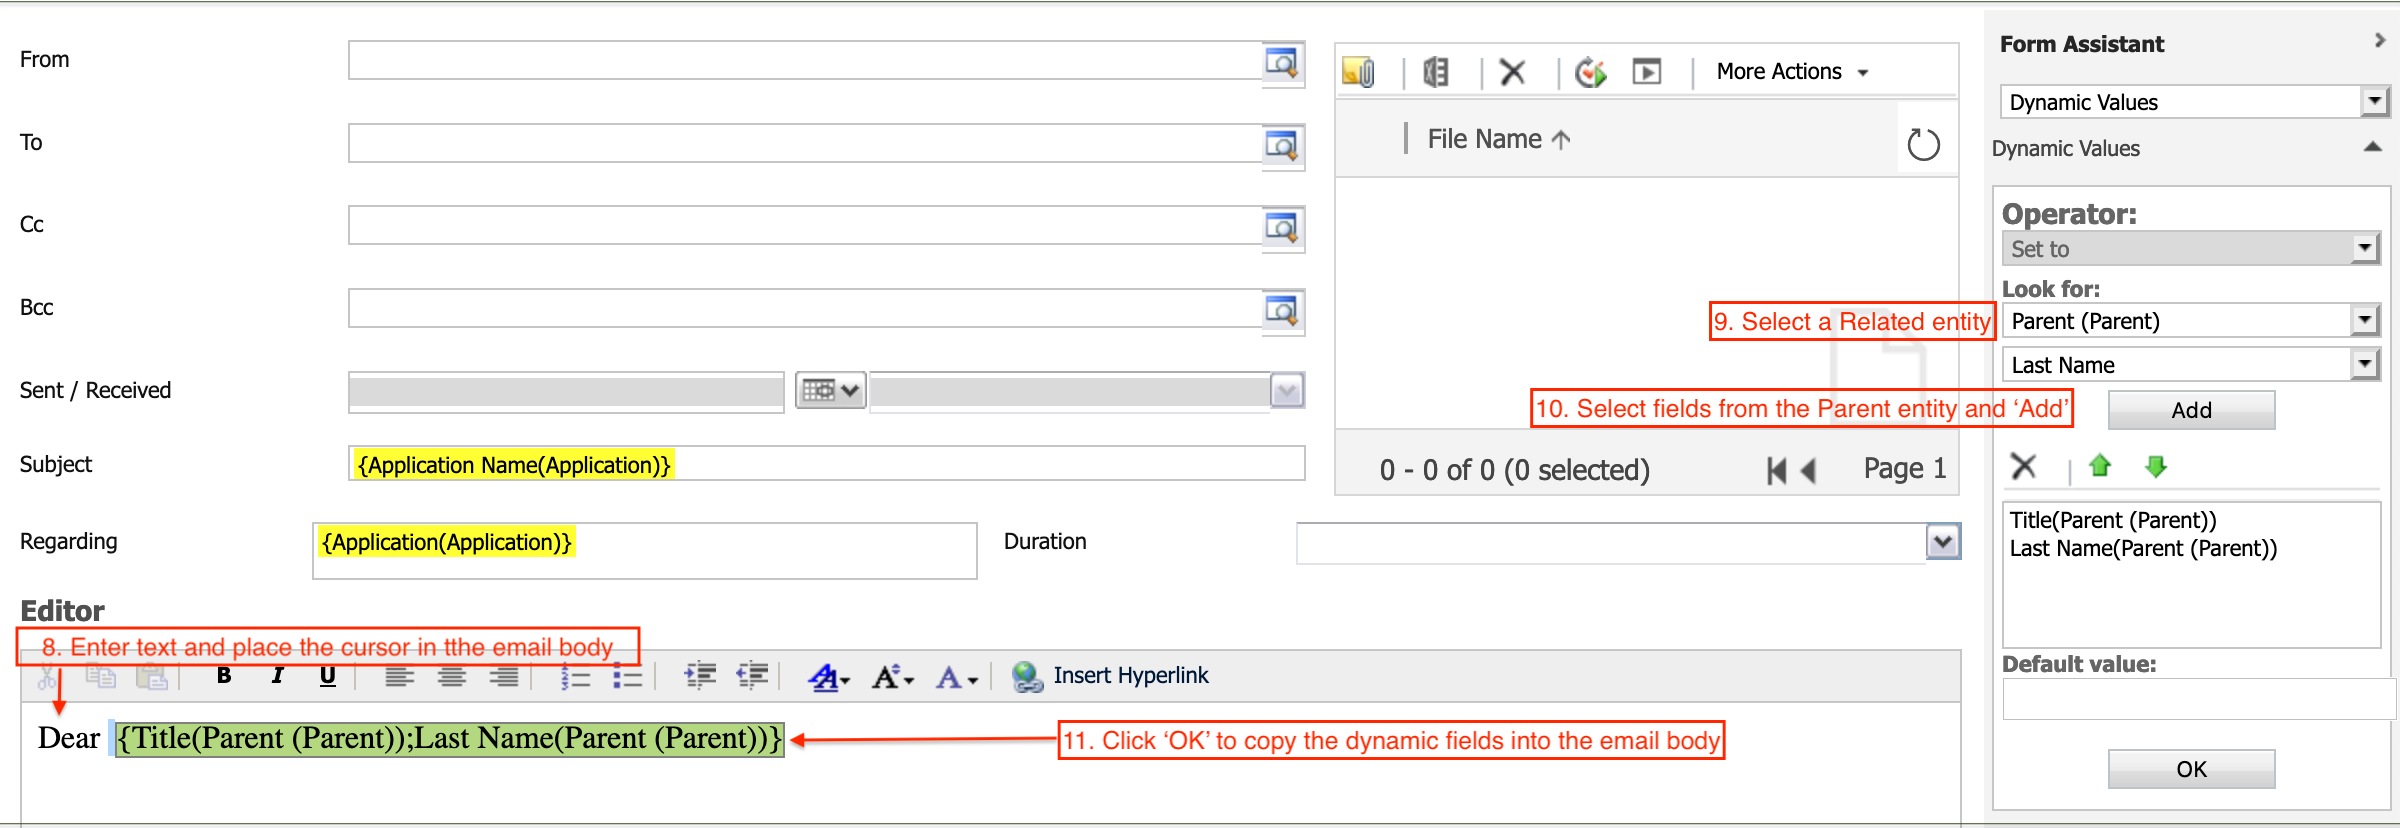
Click 'Save and Close' when the email is completed.
To activate the email workflow
Click 'Activate' on the Process Information form to enable the email to be sent.

Then click 'Activate' again on the confirmation box.
Note. The workflow can be activated later if it is not completed yet.
The options at the top of the display panel will change when the process has been activated.
Click 'Close' to close the Information form.

The new process is displayed on the 'My Processes' list.

Selecting Workflow Components
In addition to Sending emails, there are many other components available to create the steps in a workflow:
- Stage: a stage is used to split a workflow into manageable sections.
- Check Condition: a check condition is made up by an if statement, and a then statement.
- Conditional Branch: can only be created directly after a Check Condition. Functions as an Otherwise, If, Then statement.
- Default Action: used to run a series of steps if the Check Condition and Conditional Branch fail.
- Wait: waits until a condition is met, then performs desired step.
- Parallel Wait Branch: a wait condition that runs parallel to the original workflow.
- Create Record: creates an entity record (or a related entity record) in selected entity.
- Update Record: updates selected entity record (or related entity record) field with desired value, or with a dynamic value.
- Assign Record: assigns selected entity record (or a related entity record) to a user or a team.
- Send Email: sends an e-mail via new e-mail creation or via e-mail template.
- Start Child Workflow: starts a Child Workflow. Usually to perform a task outside the original selected entity.
- Change Status: changes status field of selected entity record.
- Stop Workflow: stops the workflow with a status of cancelled or completed.
Creating an Update Workflow
In this example, a Workflow is created to update the Due Date when a new Case is created, based on the selected conditions.
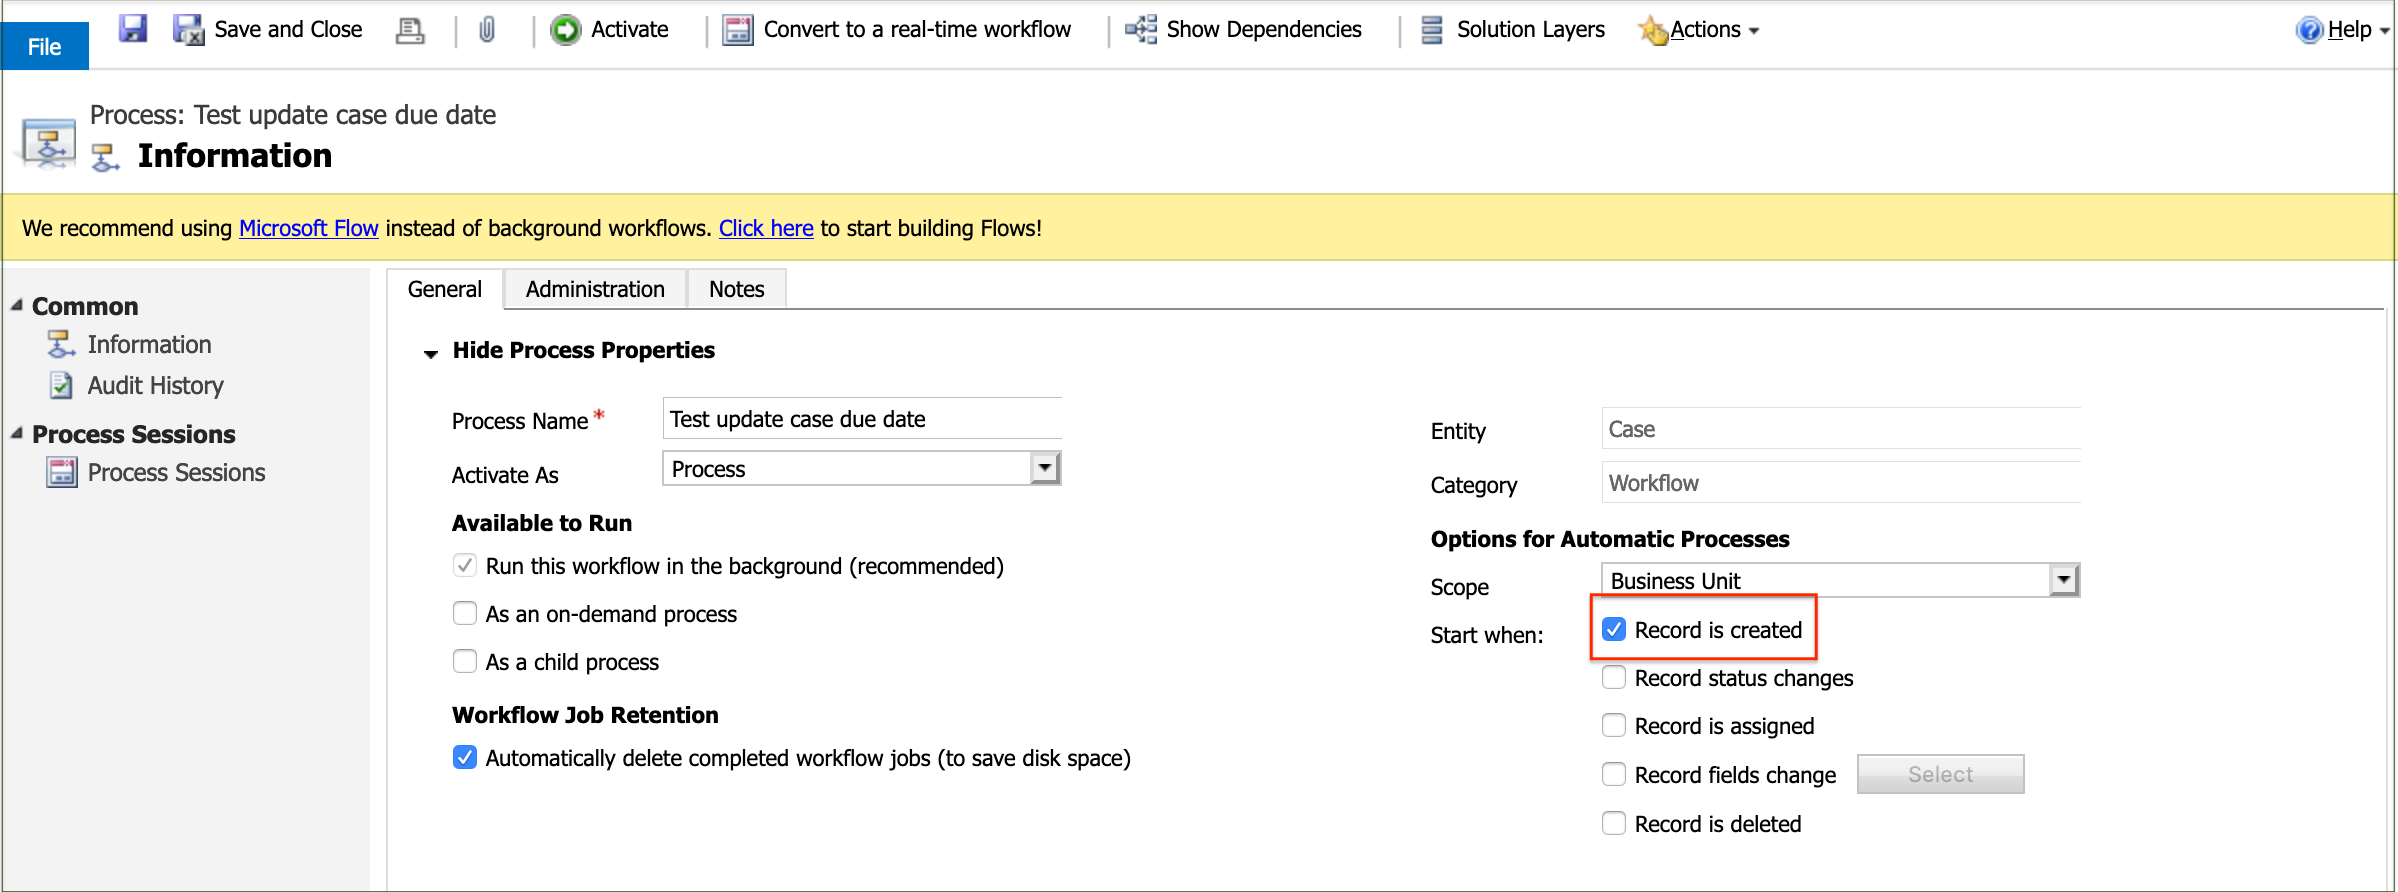
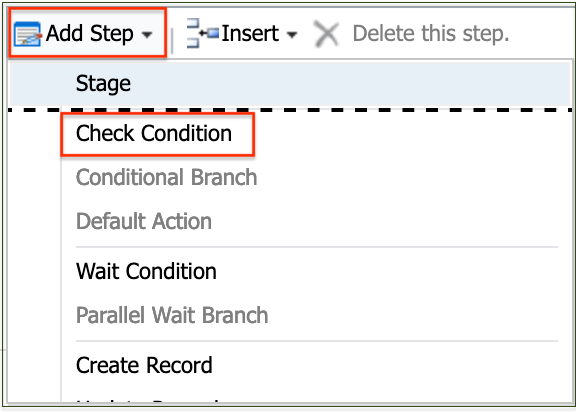
Click 'Add Step'.
Select 'Check Condition' on the drop down list to add the first step.
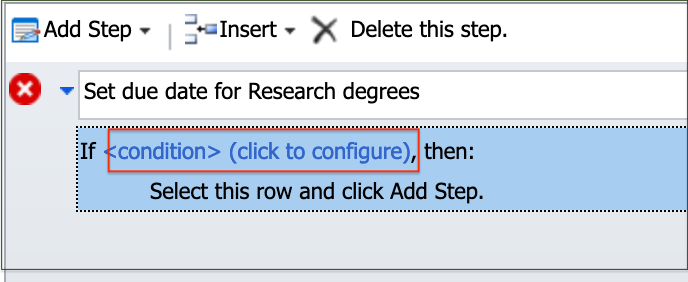
Enter a description for the first step.
Click on <condition> to configure it.
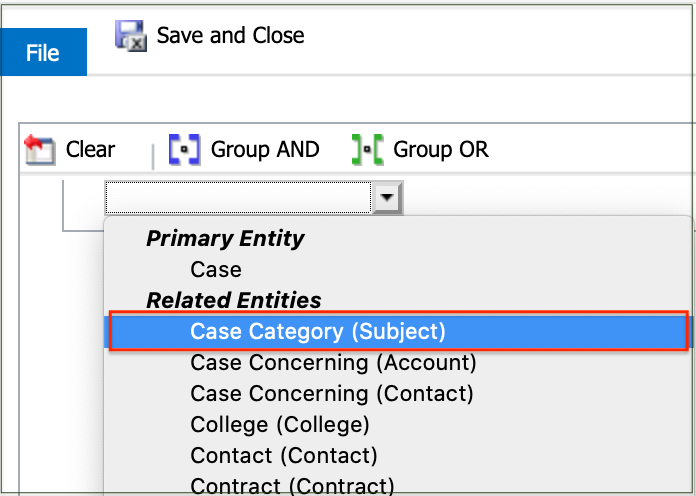
Click in the 'Select' box and select the required Entity or Related Entity for the condition.
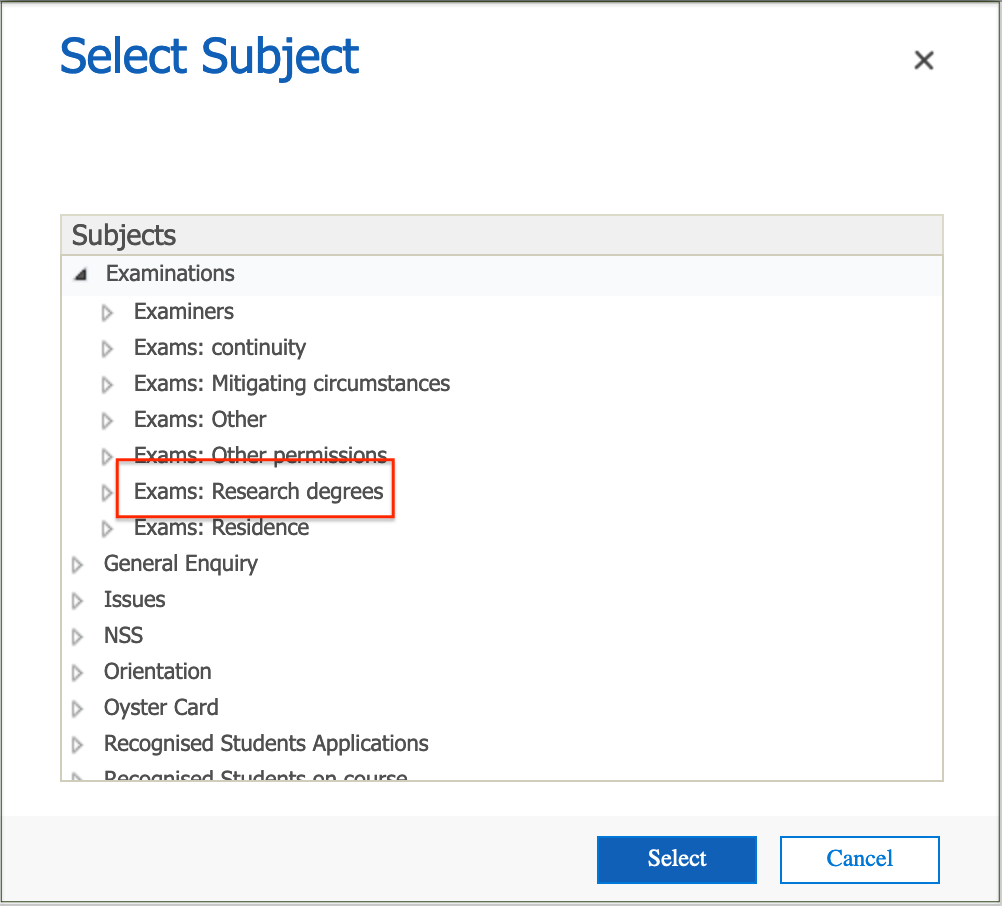
Build up the required condition through each of the options presented:
- Case Category (Subject)
- Parent Subject
- Equals
- Exams: Research degrees
Click 'Select'.

Click 'Save and Close'.

The condition is added to the first step.
Select the 'If' condition row.
Click 'Add Step'.
Select 'Update record' on the drop down list to add the second step.
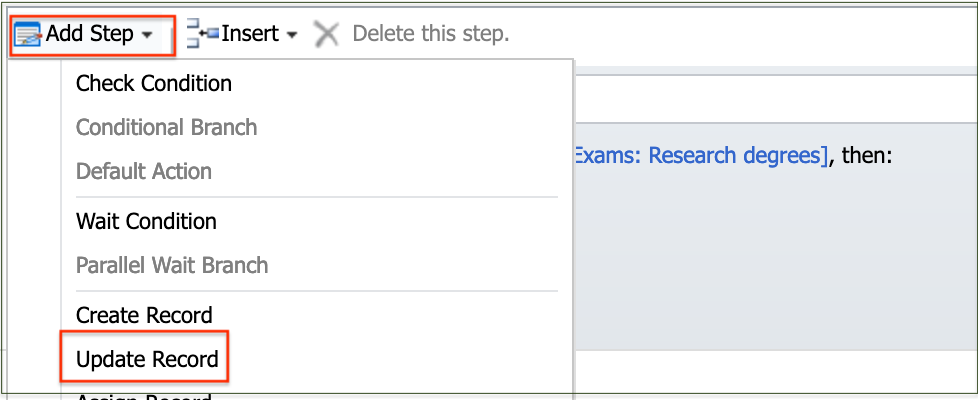
Enter a description for the second step.
Click 'Set Properties'.

On the Properties form, click in the 'Due By' field, select the required operators on the Form Assistant and click 'Add'.

Click 'OK' to copy the selected operators into the 'Due By' field.
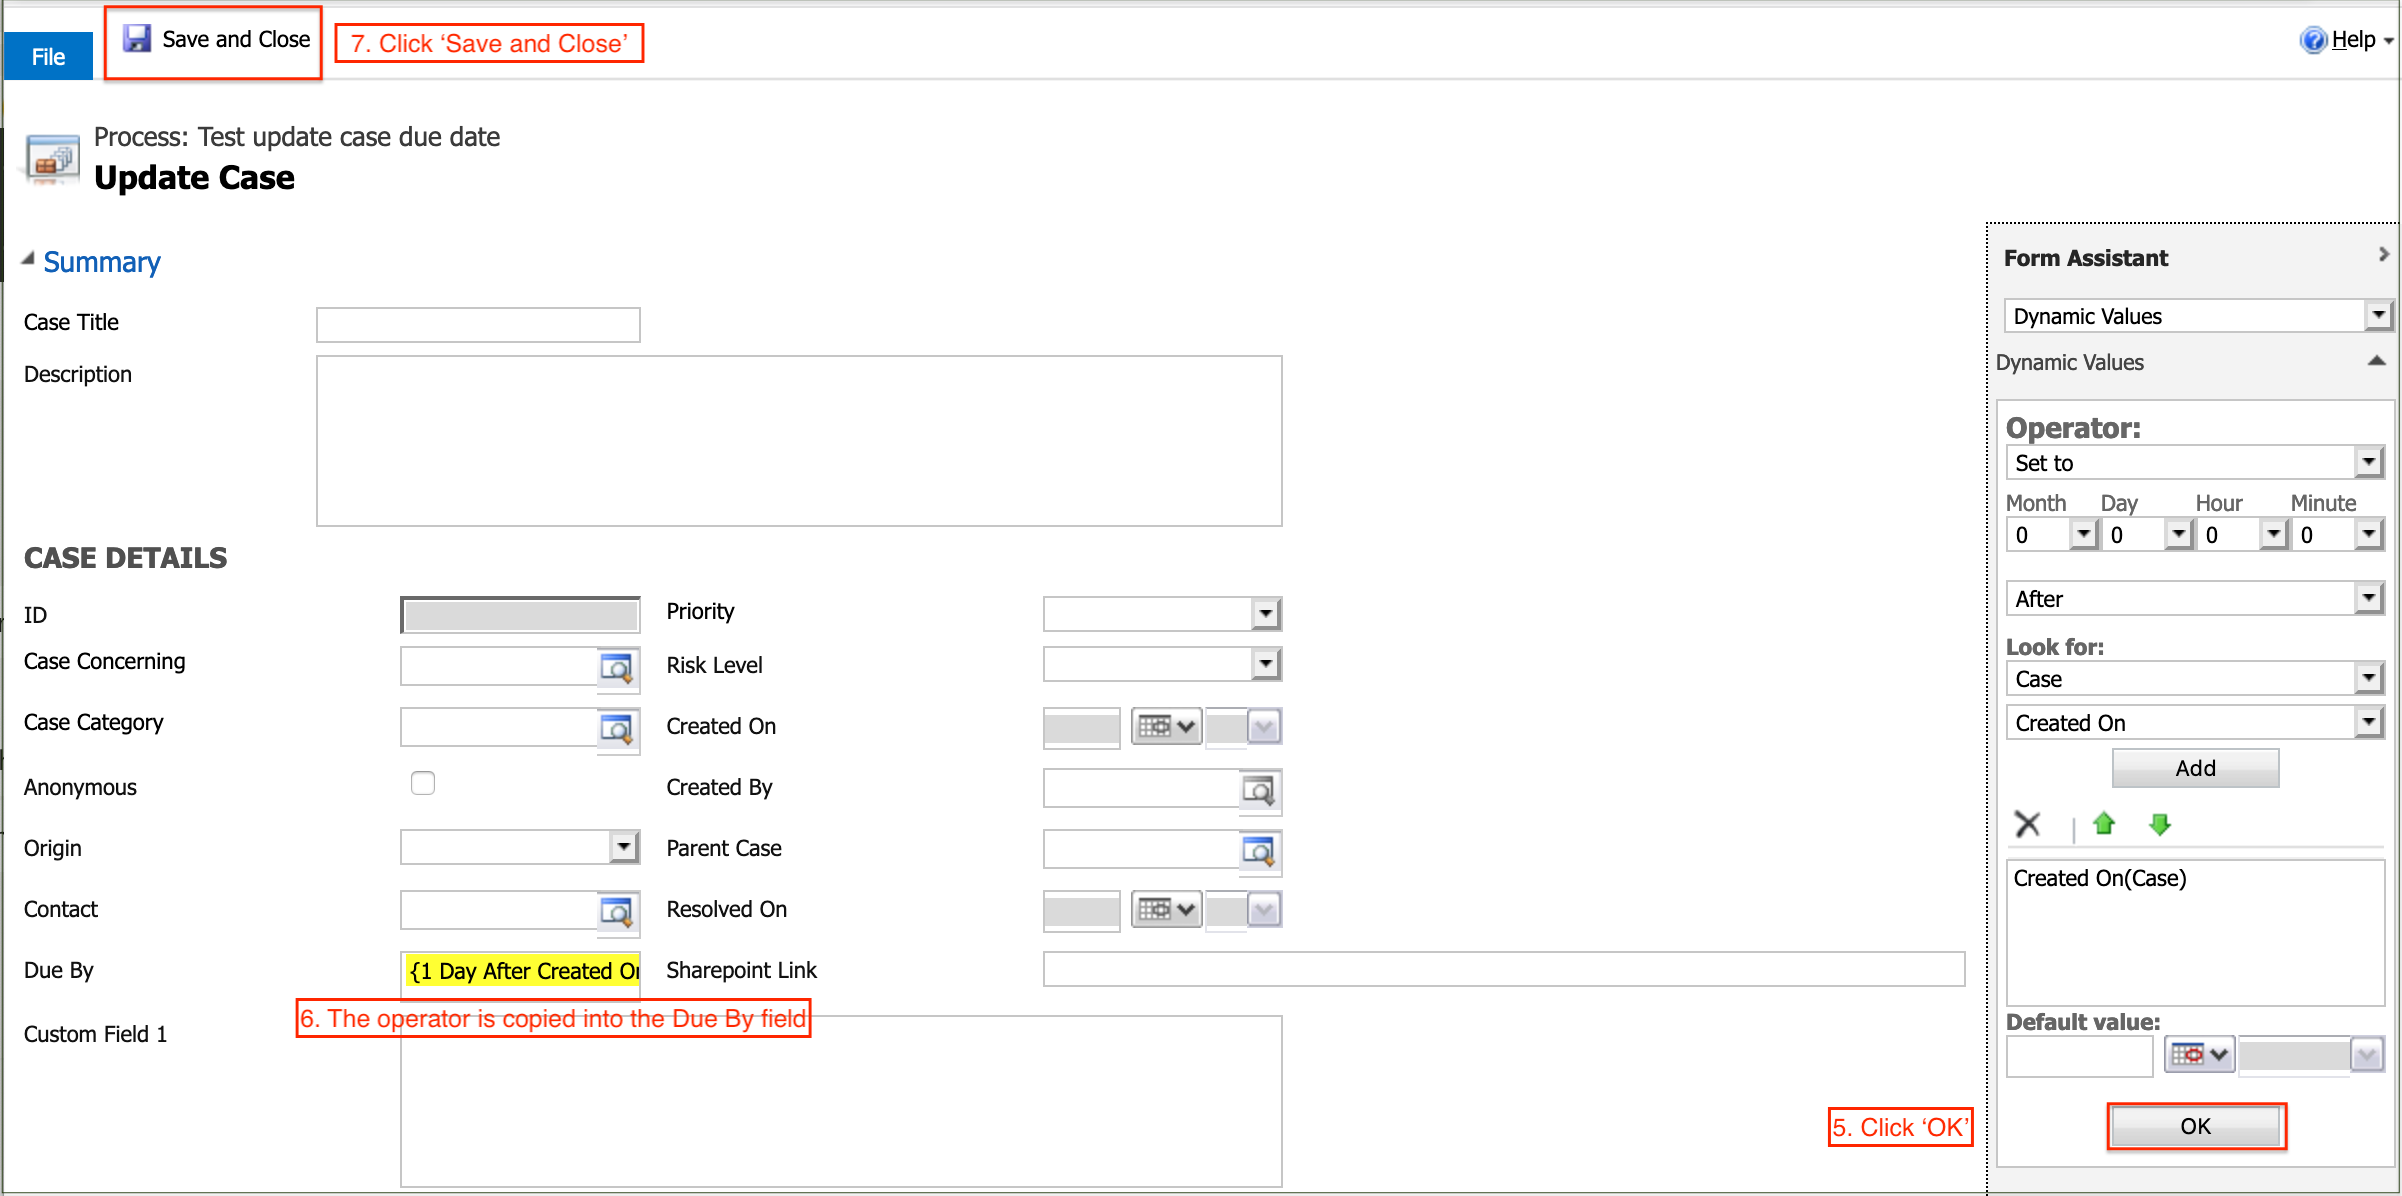
Click 'Save and Close' on the Properties form.
Click 'Save and Close' on the Process Information form.
The new process is displayed on the 'My Processes' list.

The Update Workflow can be activated in the same way as for the email Workflow.
Workflow Commands
Selecting one or more Workflows from a Process list activates the icons on the top navigation bar.

These commands can be performed by users with the relevant permissions:
Edit
A 'Draft' workflow can be re-configured by changing the options, steps or properties in the same way as for creating a new workflow.
Activate
A 'Draft' workflow can be activated to change its status to 'Active' and enable the process to run.
Deactivate
An 'Active' workflow can be deactivated to change its status to 'Draft' and stop the process from being run.
Delete
A 'Draft' or 'Active' workflow can be permanently deleted.
Copy
A 'Draft' or 'Active' workflow can be copied with options to create multiple copies and to retain the Sharing settings.
Assign
A 'Draft' or 'Active' workflow can be re-assigned to the current user, another user or a team.
Share
A 'Draft' or 'Active' workflow can be shared with other users and teams by granting permissions to Read, Write, Delete, Append, Assign and Share.
Running an On-Demand Workflow
Display a view of the required entity and select the records for the Workflow to run on.
Click on the 'Flow' icon on the top navigation bar.
Select the required Workflow from the drop down list of Workflows that are active for the entity.


